Q. I have been carving for a while now and have decided to challenge my skills, to push the envelope, as they say! Not easy to step out of your comfort zone! So, here is the problem: I am carving a 3/4 view of a grizzly’s face in moose antler. I know I could have picked an easier angle, but I thought, why not go for a little challenge, and now I am stuck! Thanks, Serge

Design by Serge Proulx

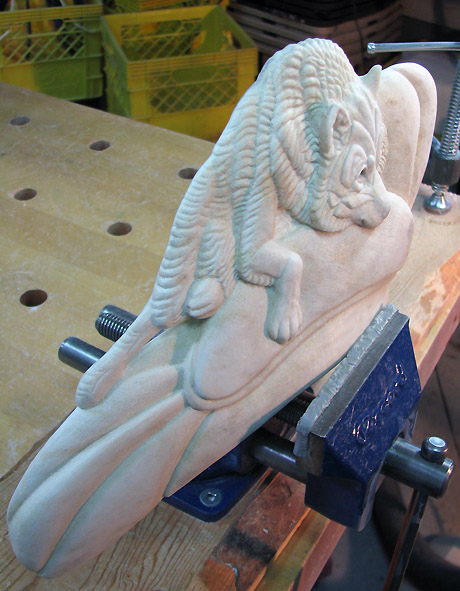
Bear – In Progress, by Serge Proulx
A. Well, Serge, you certainly have jumped in at the deep end of antler carving! Generally speaking, when antler carving it is better to choose an image or pose to be carved either in full profile or head on. Carving a face in a 3/4 profile view is very hard indeed, for a number of reasons. But, since you have asked the question, I’ll try to offer a few suggestions.
Carving a face in a 3/4 profile view is always a challenge when carving high relief, because the natural inclination is to ‘correct’ the perspective and carve the face as if it were either a full profile, or, if the face is more fully angled toward the viewer, a full front on pose. In the case above, the image has been pushed into a full profile – note how the end of the nose is squared off and the rear eyebrow has vanished, whereas the mouth and ears are still correctly placed according to the initial drawing.
But don’t panic. The carving you are looking for is still there within the antler.
The secret to carving the 3/4 face is to rely on the reference image completely, to trust it as a pilot trusts her instruments when there is no visibility. What seems right to the pilot in low visibility is not – if the instruments are disregarded the pilot’s ‘corrections’ will often put the plane into a spiral. Likewise, what seems right to the carver is not – if the reference image or drawing is disregarded, the sculpture will end up looking wrong.
Copy the main image and then cut out the head. Hold it up to the carving and re-mark your reference points exactly. Do this by looking at the carving straight on, perpendicular to the carving at 90 degrees, hold the paper in front of the antler, position a pencil crayon (the best for making marks on antler) at a key spot on the paper (corner of the eye, mouth etc.) then remove the paper and make the mark on the antler. Keep going until you have redrawn the face. You’ll see right away where you have gone astray.
Observe the larger shapes on both sides of the face. They are shaped differently. Because the mind thinks they should be proportional, it tends to adjust. Don’t do it. Try to keep the shapes intact. If in doubt, measure both the shapes and the relative distances (eg. eye to cheek) to get them right.
Also, remember that as you carve into the antler, the planes, shapes and edges will need to be checked and adjusted constantly.
Another peril of relief carving is the reliance on a single image. Sometimes the image is taken with a telephoto lens, which tends to flatten significant bits, bumps and textures. This can lead to a misinterpretation of the form, leading the sculptor to ‘place’ elements of the image in the wrong ‘layers’ or planes on the sculpture. It really pays to study the anatomy of the creatures you carve – and at the very least, look at a whole pile of pictures to get a sense of the animal from many different angles.
Sometimes, when creating the 3/4 pose, it may be prudent to minimize certain details in the carving. For example, noses can become a source of great irritation and distort the 3D effect. It may be better to hint at the nostrils, rather than carve them deeply into the antler.
Don’t be too hard on yourself, and don’t feel that the carving needs to look ‘right’ from every angle. By definition, relief carving is meant to be viewed from a very restricted perspective. Get it right so that it looks good from one viewpoint only, and stick to that viewpoint when carving, to avoid the temptation to make it look right from other viewpoints. Therein lies distortion and disaster!
Below are a couple of shots of a recent 3/4 profile carving of a wolf I am working on – I’ve been giving this question a lot of thought throughout the carving of this piece!

Wolf 2 (moose antler) by Shane Wilson – detail
Wolf 2 (moose antler) by Shane Wilson – side detail
Happy carving!
 Some carvers use the Dremel as it comes, simply inserting the various burrs into the motor itself. While this works, it is not necessarily the most manoeuvrable solution and carving intricate patterns or accomplishing fine detail can prove difficult.
 The motor is hung or mounted close to the carving, allowing the carver to manipulate the handpiece like a pencil or pen allowing for much greater control.
 The Foredom S Series uses a 1/4 HP motor and is wonderful for roughing out a carving but is less useful for creating detail, since the large flexible shaft and handpiece are not easy to manipulate with finesse. The handpiece accommodates burrs with shaft diameters up to 1/4″.
